Wednesday, November 2, 2011

Strongback, Frame 1 setup and Bending some wood

I have only had the opportunity to work on this boat project a couple of times since my last post so here is an update.  Here you can see the first Frame mounted to the keel.  I used an electronic level to help with the mounting.


The first thing that I was able to do was to build the strongback.  The strongback will give me a straight solid piece to mount the keel too and give me a baseline to measure from.  The instructions suggest to use a straight piece of wood mounted to a couple of saw horses.  I felt that I would like to build something a little more solid so I made a torsion box from 2x6"s.  Then clamped that box to a folding table giving me the flexibility to move it around.  A straight line was drawn on the strongback to lay the keel onto.

This boat isn't even done and it has already been in the lake...

I needed to soak the strips of 1"X3/4" western red cedar for a day so I could pre-bend the gunwales.  The last boat I built, I made a tube from 4" PVC but that was only 10' long and these pieces were 14' long so that would not work.  I came up with the idea of tying a piece of rope to a couple of cement blocks and tying that to to 14' strips of wood (4 of the them) an throwing them into the lake.  They soaked in the lake for a day and then my brother Gary and I filled a couple of 5 gallon buckets with water and hung them from the wood until they dried.  The wood dried in 24 hours.

Sunday, October 2, 2011

Making the Frames

I have been working on the frames for this boat.  The first thing that I did was the layout using the lofting measurements.  I plotted out the points onto both cardboard and 1/8" wood flooring.  Then I cut out the shapes.  I sent a photo off to Dave Gentry ( the designer of the boat) and he made some suggestions so I made the corrections and then cut the templates out on the band saw.
This is the layout of the Stem.
 Here is a finished skeleton of the boat and you can see the frames in their position.

Next, it was time for me to jump into my pickup truck and head to Detroit and buy the Okume Marine Plywood, from Public Lumber.  They are the only ones that I know of in my area that sell this material.

Below...you can see the templates layout on the Marine plywood.
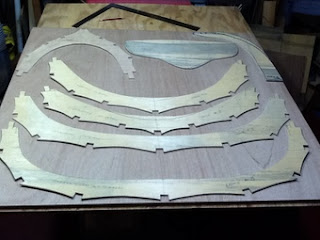
 Below are all the frames, the stem and transom cut out of the 12mm marine plywood.  I was surprised to get all of these parts out of a 1/2 sheet of plywood.


My brother Joey, came over on Saturday and gave me hand by cutting out all the notches using my mortise drill.

Next step was going to be preparing all the Western Red Cedar for the chine, sheer and stringers but it looks like that will delayed until I can get the wood.  I thought that I had that all set when I found some wood for sale on Craig's list and we made a deal but when the wood arrived is was not, Clear.  The wood was full of knots so I did not buy it.  I think I will call the mill that I used for my last boat and see if they have some in stock.

While I have time, I think I give all the above parts a good coat of epoxy.

Friday, September 16, 2011

Building Overview

The first step in the process for me is to make some templates for the five frames.  I will later need to make a stem, transom, a breasthook, a transom knee, two quarter knees, mounting brackets and a skeg - all from 1/2" (12mm Okoume marine plywood.  I will also need to make a stongback that is 9' long, rubrails, thwarts (seats), floorboards and stringers.  I will also need to skin (8 oz. polyester cloth) and paint the boat.

Back to the frame templates.  The design calls out the Frame Offsets which need to be layed out.  This is my first go at this technique called Lofting so I thought it would be best to use cheap flooring.

Below you can see that I have started to draw out the frames on the plywood flooring template.  Later, I will cut the templates and re-trace them onto the Okoume marine plywood.

Why this boat ?

My wife says, "your what, building another boat...where are you going to put it".  I won't go into the conversation after that but I will tell you, why this boat.

Here are some of my thoughts: 
1.  I wanted to build something to stay busy during the winter months in Michigan.
2.  I don't have a lot of room to build because my workspace is in my basement.
3.  I did not want to spend a lot of money on something that I really did not need.
4.  I was looking for something that would challenge my skills but yet not be a long term project.
5.  Dave Gentry has a history of good designs and when I contacted him, he replied immediately and provided me with a good building guide.  He was also very willing to answer any questions that I had.
6.  The most important thing is:  It is a cool looking boat that should provide some exercise and pride of accomplishment.

Goals:
I don't really have any.  This is just fun for me, it is not a business, just something to do.  I will take my time and work on this boat in my free time.  I will not be working on it every day.  The plan is to have it done for the spring thaw.  I am sure if someone wanted to work on it every day they could build this boat in weeks instead of months.

So I will give the same answer that I give to everyone on all my projects when they ask when it will be done?  My answer is:  It will be done on Thursday, I just don't know which Thursday.  It is not the speed of the build but the journey of the build.

Oh yeah, as far as my wife goes.....she is now OK with me starting another project as long as I don't bug her when she is reading her book or watching her favorite show, make a big mess, spend a lot of money......I think.

A skin-on-frame boat designed by "Dave Gentry"

The beginning photos in this blog are used from Dave Gentry's website to give you an idea of the look and shape of this boat.  If you would like to build this boat from plans or obtain a kit for it, contact Dave Gentry.  I am building this boat because I enjoy the process and learning new things so I am attempting to build this project from a building guide that Dave provided.


The Shenandoah Whitehall is a  light (SOF) Skin-On-Frame adaptation, superb as a rowing craft, and capable as a sailer with the addition of a simple spritsail rig. She's 13' 6" long, with a beam of 47", constructed of marine ply and cedar stringers. Skinned with 8oz polyester, the rowing version weighs about 55-60lbs, with full floatation under the thwarts. She's relatively easy to carry and cartop - no trailer necessary!